Showing posts with label performance. Show all posts

Wednesday, October 28, 2009

My new toy

Regular readers will have noticed that I haven't been posting much lately. I can now reveal why, which I will do with the following video:


Initially I tried to make something that looked as exciting as a Top Gear segment, unfortunately it turned out as drab and dreary as a MotorWeek episode. Probably mostly due to my anything but engaging tone of voice, and due to my budget for this being on par with a typical MotorWeek episode. I hope you did notice that, unlike Motorweek, I actually had cool cars, and dared to make negative comments (that didn't refer to daily driving issues).

So that's what's been keeping me busy for the past month.

Sunday, July 12, 2009

Carburettor Madness Part II (pictures this time)

  • Carburettor (Weber DGV) fine-tuning
  • How to adjust the idle speed screw, the long way (when all else fails)
  • Actually got to drive around the neighbourhood for once, reliably.
  • Managed 60 mph, easily (couldn't go over 30 before...)
  • Fixed rough idle
Last time I discussed some general things concerning Weber DGV's and MGB's. I did some more fine-tuning today and learned that the 1.5 turns out on the idle mixture, as suggested by the webpage I discussed last time (by the way, still the best Weber DGV tuning page I've found) was not enough. I'm at about 2.25 turns out now which seems to be necessary to keep things running well (possibly due to the Peco header). The idle mixture screw is the one on the bottom of the carb, closest to the intake manifold (in an image further below I show where the idle mixture screw leads to). It's not the easiest screw to get to, but with some persistence you can get to it.

Much more frustrating is the idle speed screw, which is conveniently located in a completely inaccessible position while the carb is mounted (this may have been fixed on newer Webers). I found another screw next to the choke that links some stuff to that screw, and so in essence you can directly adjust the idle speed screw from there. I haven't tested the long-term effects of this, and I could be completely wrong, so if you try this be careful. The screw I'm talking about is shown in the picture below. Note that it is not directly attached to the choke, and as far as I can tell only affects how far the choke opens, but has a larger impact on the throttle plate.


My carb was so far out of wack I had to visually inspect the idle speed screw and the location of the throttle. When you turn the carb upside-down and look in the shafts you should be able to see three holes (open the throttle; see image below). These holes are outlets of various fuel circuits, and are activated based on how open the throttle is (interestingly, note that the secondary shaft only has two holes which are only activated when you're really flooring the accelerator; not shown).


I adjusted the idle speed screw directly linked to the throttle (so, not the screw near the choke as described above) so that the right hole, the 'highest' of the three holes, is just covered. The image below shows the right hole just peeking out, and thus how you should not have things. Make sure you cover that hole entirely. Put the whole thing back together, and make fine adjustments from the screw near the choke.


In a previous post I called the Peco exhaust noisy and unpleasant, leaving me with a ringing in my ear afterwards. Having properly adjusted the carb the sound, though still rather rough, was pleasant in the sort of roar one expects from a performance vehicle. Idle was very quiet, full throttle ear-deafening, in between pleasantly throaty. I bought this exhaust for it's performance aspects (which I have already noted - it works), but if you're looking for a comfortable drive I wouldn't recommend this.

Sunday, June 28, 2009

Carburettor Madness

  • Rebuilt the carburettor (Weber DGV)
  • Fixed fast idle
  • Got normal gas mileage (~23 mpg instead of 7)
  • Misfiring and backfiring resolved
Diligent readers will have noticed that it's been a while since I've last posted. There are various reasons for this -work, travel, family, etc, I'm writing this in Poland- but the most pressing one would have to be that when I replaced the B's exhaust, as described in the previous post, I killed the car.
It just so happens that the various systems of this B were working together in perfect harmony. I was always aware that the engine was running rich (7mpg is not very good, not even for an old MG), and that the exhaust had a massive gap under the hood and was sending exhaust fumes into the cabin. But I didn't know that the exhaust gap was indicative of a clog further down the line, and the exhaust fumes not being vented were choking the engine, which was compensated for by having a richer fuel mixture. When I replaced the exhaust system the engine was free to breath again, and the excess fuel was burning off as it should. However, this resulted in an engine refusing to go lower than 3000 rpm (and would stay high if you tapped the accelerator), an exhaust manifold turning bright orange, and flames shooting out the carburettor and the muffler (worse than before). My car was shitting itself while throwing up, but still devouring gas. It was bad.

There were several problems with the carburettor after I rebuilt it, mostly linked to the previous owner not having the right settings and overcompensating for the asphyxiated engine. Rebuilding a Weber is quite straight forward (I bought a manual but have yet to read it); essentially just grab a screw driver and pull stuff out. In a next post I will post pictures with descriptions (once again, I'm in Poland right now). Here's what I've learned, and some tips on what to do when rebuilding your carburettor (specifically, the Weber DGV):
  • Unless you really need to change everything, don't bother with a rebuild kit. Buy the gaskets separately, and get all the rest from a local hardware store. Rebuild kits are about $35 for stuff you can get for less than $15. Also, in my case the parts were of inferior quality (previously metal parts are now plastic or even paper!). This brings me to ...
  • Buy a new power valve. I guarantee you, if it wasn't already broken you've broken it now. A broken power valve is what caused my engine to race and not idle below 3000 rpm (the power valve activates circuits supplying fuel for conditions requiring more fuel than at idle). It's an easy replacement I highly recommend, but is not included in most rebuild kits. It costs about $20.
  • If your car comes with a vacuum advance vacuum port on the distributor, keep in mind that ported vacuum from a Weber acts differently than manifold vacuum, the system the distributor was designed for. The engine goes crazy when I connect the vacuum port from the Weber to my stock distributor (the original one with an amplifier in my '77). The engine runs fine without it, so I'm leaving it disconnected for now. UPDATE: This does not happen anymore. In fact, connecting the vacuum port to the distributor actually reduced misfiring. I think there were too many other problems at the time I wrote this article. Alternatively, you could buy a different intake manifold (a non-Weber manifold) which has more vacuum manifold ports (you'll see what I mean if you care about vacuum). As I'm replacing most things, I'm replacing the distributor entirely at some point.
  • Do all fine-tuning before putting the carb back on. On my B the fine-tuning screws face the wrong way, towards the engine, making fine-tuning a pain in the butt. Also, with the carb out you can see what the fast idle screw is doing to the throttle, and how it's placed with respect to the fuel lines of the various circuits. I'll go into more details on this later.
  • The float was another source of frustration. Too high, and fuel will spill over the holding tank and go everywhere, which could result in a mini aurora-borealis under the hood. Too low, and the car will never run on it's own. Weber manuals describe correct heights of floats, and I strongly recommend you stick to them. Unfortunately my float did not appear in any manual, and as it was a brass one (not plastic like the new ones) I wanted to keep it. So I just fiddled with it a few times till fuel wasn't overflowing or starving the engine. This took a while, and was very frustrating.
  • British fuel pumps are garbage. One minute they're too weak, the next they're so powerful the intake needle won't close and fuel shoots out everywhere. I recommend buying a fuel pressure regulator and setting it for 3.5 psi.
  • WEAR SAFETY GOGGLES!!!! Flames shooting out the intake almost cost me all my facial hair. I guess I'd recommend at the very least keeping the air filter and cover on while doing any work with an engine running... Also, I had to often remove the fuel line while it still had some pressure, resulting in fuel shooting out. Fuel in your eye can result in blindness! Wear goggles! (Well, atleast while doing stuff with fuel and oils.)
The trouble with carburettors is that they are very fine-tuned pieces of equipment. Screws slightly off can result in complete chaos. For example, if your mixture is too lean the engine won't start or stay on at all. Too rich, and you could blow off more than just your eye-brows. In either case, long term usage of bad tuning can result in severe engine damage (slightly off is OK).

General Weber tuning instructions can be found here. These are very good instructions that helped me get things started again. Remember to adjust the timing after this.

Some documents of interest:
Quick trouble shooting guide (did not help me)
Complete Weber installation guide

Note (from below): These files and links are posted for informational purposes only. No profit what so ever is generated from these files. These files can be found everywhere on the internet and are simply collected here for reference purposes.

UPDATE: I have done many more things to the carburettor. Click on the 'weber' label on the right for all updates.

Monday, May 18, 2009

New exhaust, new woes

  • Installed new complete Peco exhaust system
  • No more exhaust fumes inside the cabin
  • Engine can breath freely
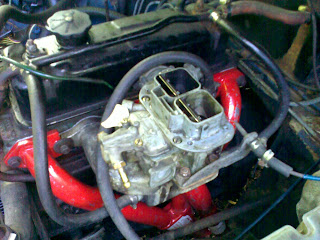
I plan on eventually turning this car into a real performance car, so the first step is always to put in a decent exhaust. The previous exhaust had bulged open at the end of the exhaust header and was letting exhaust fumes into the cabin, which led me to believe that it may be clogged somewhere (which is not surprising if you consider how much time this car has spent under a tarp over the past few years). So I decided to pull it and replace the whole thing.The exhaust header, though rusted, was still in great shape. I thought of just sanding it down and repainting it, but had a hard time finding head pipes to connect it to a new exhaust. The rest of the exhaust was in good shape (barely any rust), but seemed clogged. In the end I bought a new Peco header (see image above) with the rest of the exhaust system, a 2-inch straight through system (and a big FU to the EPA). Note that in Maryland classic cars are exempt from state emissions testing, and so removal of the catalytic converter (if there is one, mine did not have one) is legal. This is not the case in California, where pretty much any exhaust or emissions modification is illegal. So check your state regulations to make sure it is as cool as Maryland :-) (if you're in a southern state or Michigan, you're good to go).

Update: It has been brought to my attention that removing the catalytic converter is illegal by federal law. Though Maryland is not going to check (assuming you have historic tags), you would apparently still be breaking the law if you remove the converter. A car must always retain its originally installed emissions regulation equipment, even if it fails (!). So draw your own conclusions...

There are several considerations when purchasing an exhaust system, but it generally boils down to whether you want a comfortable or a sporty ride. My Peco system is incredibly loud, and after a short drive my ears were ringing (this will probably improve when I put in sound insulation). It only has the one straight-through muffler, so not really ideal for comfortable riding. If you're looking for a comfortable ride you'll need a decent muffler or a 2-muffler setup (more common on the MGB). If you're a tree-hugger you'll also want to throw in a cat convertor.

When picking a header one should pick one with the least amount of curves, thus improving the flow of gasses. More angles mean a slower flow, though this is generally a very modest decrease. On the MGB there are only 3 exhaust ports for a 4 cylinder car, which seems wrong. This was a conscious choice by the engineers to save manufacturing costs, but was designed in such a way that with it shouldn't impede exhaust fumes too much, however, efficient expulsion of those fumes is very important. The centre two exhaust valves are connected (the so-called 'siamese' system) and go out through one pipe, so naturally that pipe should be larger than the other two (which each serve one valve respectively). The Peco header has a larger centre port which merges with the other two towards the end of the pipe, thus enabling a better flow of exhaust fumes. There are MGB engine upgrades available that allow for four intakes on one side and four exhausts on the other side of the engine (but be prepared for some machining).
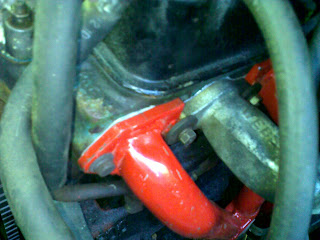
A major issue when picking exhaust systems for the MGB is picking the right setup. Over the years the exhaust and intake system changed many times, so a 1980 MGB will have a completely different setup to a 1965 MGB (and I mean radically different). Later models have catalytic converters (under the hood, not in the back) and different intakes. I would strongly recommend retrofitting your car to the old-fashioned exhaust system as I did, but you will also most likely need to change your carburettor and intake manifold for this. This allows for a better freer flow, and will bring your engine closer to the original 98 hp it once had. Consider the Weber DGV (downdraft) if you do this conversion.

The exhaust arrived and I set out to install it, which is a very simple procedure in principle. As it differs on most cars I'm not going to give detailed instructions. Rather, just take a look at your old exhaust and figure out a way of putting the new one in. Don't know what to do? Just start taking it out, and make sure the new exhaust system fits snugly and doesn't move. If it is designed for the MGB it will fit, you just have to keep trying. Here are some tools you will need:
  • An electric saw (to saw through pipes and bolts that won't give way)
  • A wrench set
  • Ramps !!! (I used jack stands and a floor jack, which I do not recommend)
  • WD-40
  • Muffler clamps (to hold together the pieces of the exhaust system; typically not included)
  • A friend to hold stuff
  • Patience. Lots and lots of patience. This took me 2 days and was incredibly frustrating.
Note that on some exhaust systems, as was the case on mine, the intake header has to be in place before you put in the exhaust header. Use a mallet (or a hammer if you get fed up like I did) to get everything in place. The Peco seemed to touch the rear suspension, but that was because I had the pipes in the wrong order, so be mindful of that.
Now, I was planning on posting a video showing the before and after sounds. Unfortunately my carburettor is acting up, and the damn car won't rev lower than 3000rpm. As I had the intake out anyway I thought I'd rebuild the carburettor. Apparently I did something wrong. As soon as I figure out what I did wrong I'll post it and my solution. In the meanwhile, if anyone has any suggestions....