Tuesday, June 28, 2011

Bye for now

As many in the US must have noticed by now, the economy is pretty bad. The job market is also rather dismal, which has had an impact on me. It probably wasn't a very good idea to graduate last December, as I have been unemployed since then.

Fortunately my luck turned at the beginning of May when, despite a rather terrible interview (on my part), I was picked along with three others to do a very exclusive internship in London. A month later my bags were packed and I was on my way to Europe. My first day on the job is next Monday, and I'm rather looking forward to it.

This also meant having to leave my life in the US behind: my dogs, my apartment, and my cars. The latter, for the purpose of this blog, was the most painful one to leave behind. So until I figure out if I'm staying in London, moving back to the US, or moving to another part of the world altogether (I hear Singapore is nice, and the job market is good), I'm putting the cars in storage. I've already received shipping quotes for the cars to most of the world (~$1000 a piece), so I guess we'll have to see what happens.

In the meanwhile for obvious reasons I won't be working on either of my cars. Just know this: I will be back to work on them, and will do so properly next time (with money and a garage).

Here's a video (in HD) of how I saved money by putting them both in one storage container. Press full screen if the banner on the right cuts over the video, or click the video a few times till Youtube opens.


Till next time! If anyone in London is looking for someone to help out with their British classic on the weekends, drop me a line!

Like this video? Check out my other video with more details on the MGB and XJS you just saw.

Monday, November 22, 2010

Radiator painting

You would be right to assume that I have somewhat neglected the 'B' this year. Unfortunately, my XJS has been keeping me (and my wallet) rather busy. And as I have to drive it to work every day, I have to keep it running. The XJS was at a tipping point when I got it, but I'm pleased to announce that I think I've pushed it away from the brink of inoperability. A strong engine and accomodating transmission allowed me replace pretty much every service part: hoses, electrical components, all 6 (!!) shocks (of which 4 McPhearson...), ball joints, fluids, brakes, lenses, etc etc etc. It's been a real pain in the ass.

Things are finally clearing up a bit for me, in that I am graduating (just 3 weeks left) and about to enter the world of unemployment! This means that I'll have plenty of time to work on the B. I don't actually want to be unemployed, so if you're reading this and need a management consultant or electrical engineer (I'm two in one!) please visit my website and take a look at my resume: www.arunluykx.com.

Anyway, back to the B. Obviously, between my thesis and that blasted Jag, I haven't had any time to do anything recently. So here are some pictures of me refurbishing the radiator last summer:

Above: Sanding down the top of the radiator revealed a painted over brass top. Using brass polish I was able to really clean things up and make it shine.
I covered up the rest of the radiator with masking tape and painted the non-brass surfaces with black POR-15 paint. I should note that POR-15 is truly amazing paint. I've also used it on the front grille of the B.Above: The final result. Unfortunately this terrible cell-phone picture does not do the details justice, so I'll post more pictures during my unemployment. I also replaced the hoses during this, and ran a coolant flush through the radiator to remove some junk.

Tuesday, August 17, 2010

Finally got the wheel off!!!

  • Replaced steering wheel with Nardi wheel
  • Resolved another Leyland mistake: that hideous rubber covered steering wheel
  • Gained access to turn signal/ light control
  • Much easier removal of dashboard (to fix lights and such)
Finally, after MONTHS of trying, I was able to get that horrible Leyland style rubber steering wheel off! Well, it wasn't me as much as it was a colleague of mine who also happens to have an interest in classic cars.

I tried various tools: hub pullers, hammers, tons of penetrating oil, a puller I made like the one from Moss (which sells for $50), etc, but all to no avail! In fact, conventional wheel pullers will not work with this car. Rather, the remedy was simply persistent pushing and pulling the wheel from side to side. Just keep working the wheel gently. Don't use a hammer (I managed to damage the threads doing this). It took about half an hour, but in the end the damned thing came off! Despite drenching the thing in Deep Creek, hardly any of the oil had actually gone down far enough to actually loosen up the splines.

I can't take credit for the work, I'm not patient enough to do anything like that. All credit should be directed to my colleague and future car collector, Matthias (see picture).

So basically: trying to take the steering wheel off? Forget about buying anything! Nothing works. Trust me, I've tried it all. I even bent the old wheel in the process.

Sunday, March 21, 2010

And We're Back

The 100 feet of snow we had this winter wasn't enough to collapse the old bird. However, when I went to take a look at it today I realised my first task was going to be a spot of gardening. Here are the before and after photos:


There was A LOT of bamboo all over the place. Amazingly the roof was still intact, despite numerous branches having fallen on it. The roof was not intact after I accidentally poked through it while removing a branch.

Next week I hope to do some real work...

Tuesday, March 9, 2010

University Motors is Back!!!

John Twist recently posted that University Motors is back in business:

As I pondered my future, I could not escape the undeniable fact: MG is my destiny. We are now re-awakening University Motors.


Read the full post here: http://www.mgexperience.net/phorum/read.php?1,1377891

Friday, December 25, 2009

Wednesday, November 18, 2009

Fudge values and bearings

  • Correct bearing tightening instructions
  • Brakes work again, even when turning
  • No wheel wobble at high speeds
  • Greatly reduced chances of dying

I strongly believe in the value of fudging values from time to time. 5 ft/lbs? Finger tight! 0.05mm tolerance? Finger tight! 32 PSI? Yup, finger tight!! Please note that I am not an accountant, and do not work in the finance industry (where a lot of 'value fudging' goes on as well, I imagine...).

Unfortunately this does not always work. Bearings, for example, are an example of one of these situations. I learned that this week when the brakes on my XJS stopped working every time I made a hard left or right.

I recently changed the bearings on the XJS, but followed my usual method of tightening the end nut: finger tight plus a turn of the wrench. Generally that's good enough (as it seems to be for the MG). Tightening too much leads to premature wear of the bearings, and that lovely grinding noise you sometimes hear on old cars. Too loose has never been much of a problem, so I didn't think too much of it.

Well, I was wrong. Turns out the XJS needs a full 25 ft/lbs on the end nut (as pictured above, on the MGB, before pin removal), backed off one flat (and more if necessary to fit the pin back in). After adjusting this the brakes returned to normal, and high-speed driving stabilised a bit. Turns out the nut was loose enough to let the rotors move around enough to push back the brake pads, but only when the wheels were turning. So really the brakes were working fine, it's just that they had to be reset each time I made a turn.

So:
Here are my general bearings instructions (for the MGB and most cars that aren't Jaguars):
  • Tighten the end nut to 5 ft/lbs while turning the wheel. If you hear grinding or anything like that your bearings may be bad, or some dirt may have entered the hub. Clean the hub and make sure you pack it with (clean) grease.
  • Loosen if necessary to enter holding pin
  • Reassemble the wheel (keep it jacked up).
  • Check for wobble by holding the wheel on the top and bottom and try to make it wobble. Then hold the wheel on the left and right, and do the same. If you feel any wobble or anything that seems too loose, tighten the end nut a bit, and recheck.
  • If everything seems right, take your MG out for a ride. If you do not notice the same or better performance, something is wrong (duh, this counts for anything I guess...). The best speed, in my opinion, to find problems is around 70 mph. Good luck.

Mind you, despite the bad braking and wheel wobble I still did a 400 mile road trip at 80+ mph speeds....

Wednesday, October 28, 2009

My new toy

Regular readers will have noticed that I haven't been posting much lately. I can now reveal why, which I will do with the following video:


Initially I tried to make something that looked as exciting as a Top Gear segment, unfortunately it turned out as drab and dreary as a MotorWeek episode. Probably mostly due to my anything but engaging tone of voice, and due to my budget for this being on par with a typical MotorWeek episode. I hope you did notice that, unlike Motorweek, I actually had cool cars, and dared to make negative comments (that didn't refer to daily driving issues).

So that's what's been keeping me busy for the past month.

Sunday, October 18, 2009

Carburettor Madness Part III (bright orange exhaust)

  • Further fine-tuning of the Weber DGV carburettor
  • Adjusted timing at the same time
  • Removed air-intake heating
  • Exhaust manifold does not glow orange anymore
  • No more vapour-lock
There are many sceptics on the performance of the Weber DGV (in fact, only hours after posting this I already got a nasty comment, see the comments section for this entry). It's often called inefficient, not performance-driven, needlessly complicated. Many 'other' MG owners swear by their SU's. I think I've even heard of someone liking their Zenith!

Well, they're all wrong. Completely wrong, in fact. The Weber DGV is a fantastic carburettor. It was not specifically designed for this car, so odds of it working right out of the box are often tiny (versus an SU that would probably work right away). However, online retailers are selling kits specifically tuned for your MG (Moss, Brittek, etc., see links on right) that make tuning much easier. You may even be able to take your MG for a spin the same day you install it!

For others, such as myself, who bought an MG with a Weber already fitted, you may find yourself in a bit of a bind, trying to figure out how to undo what others did. My Weber was set to over-rich, compensating for bad plugs and a clogged exhaust. My horrible rebuild attempt did nothing to improve the situation; throw in the new Peco exhaust and you've got a recipe for disaster I only overcame yesterday, about 4 months later (on and off, mind you).

That's where the internet comes in handy: through fora and blogs such as this one, we try to make owning an MG pleasant for other people so they don't have to deal with the same non-sense we had to. (Unlike Jaguar owners, I might add, who for whatever reason are part of some tightly knit club. How do I know this? Stay tuned...) So when in trouble, my recommendation is to search the internet.

Update 3/11/2010: OK, so I was being a bit harsh on the Jag people. Though I still think they are a very different breed to MG people, most are very willing to help newcomers. Being a Jag/MG person myself I am always ready to help a fellow Brit-car enthusiast.

My main point today is that it is crucial to set the timing right (about 14 BTDC for a Weber DGV) to make everything come together. Bad timing could be one cause of misfiring or backfiring (where the explosion happens too late, and ends up in the exhaust manifold). The mixture on my DGV was set properly, but the exhaust manifold glowed orange. Checking the timing, I noticed it was set to 5 BTDC. Resetting it to 14 fixed the exhaust problem.

Another problem I've been having lately is that after running for a while and stopping, the car would not start up again. All signs pointed to not enough fuel reaching the carb. The pump was working and the filter was full (one of those stupid clear Lucas filters actually came in handy for once), but the fuel kept evaporating when it hit the bowl. Without manifold vacuum that vapour was going nowhere. My solution was to get rid of the hoses used for intake heating (plugged them up with a bolt), which dramatically reduced the temperature in the bowl so fuel would stay liquid. The intake heater is a fuel-economy thing that I do not think really necessary. I may attach it again in the heart of winter.

So:

Bright red exhaust manifold?
  • Mixture too rich
  • Timing too retarded (advance to 10-14 BTDC)
Misfiring?
  • Mixture too lean
  • Timing too advanced (retard to 10-14 BTDC)
It's that simple. Please see my other posts (click 'carburettor' on the right) on fine-tuning the Weber DGV.

Also I passed my qualifier exam!

Wait, what's this??? :
More very soon...

Friday, August 21, 2009

Cracked radiator

I'm right in the middle of my qualifier exams at the moment -the exams every PhD student has to take in order to keep receiving funding, and to stay in the programme. It's a two week gruelling event ended by an hour-long presentation on a topic you've only known for two weeks, during which professors get to grill the hell out of you asking everything from 'what does that electron do' to 'why are my pants blue?' It's murder.

Anyway, car stuff doesn't stop for anything. So I thought I'd share some recently acquired experience with you so you don't have to pay $60 to be towed 15 miles:

When your radiator starts leaking, PATCH THE LEAK OR REPLACE THE RADIATOR!!

Here's what the radiator (in my Altima) was doing one day:


In the video you'll notice a small bubbling leak coming from the top plastic part of the radiator, right where the Nissan logo is. I didn't think too much of it and just patched it up with some tape. I figured I'd replace it eventually.

I drove up to Jersey and back (4 hours each way), but on the return trip noticed that my AC wasn't working too well. Looking down at the gauges I saw a needle way past H, and eventually saw smoke coming out of the hood. So I turned off the engine, pulled over (without power steering - quite difficult in this car), and waited for AAA. Here's what the radiator looked like afterwards:
Note that this crack spans from the centre till way into the left side of the radiator (sorry, cell-phone pic). Thinking about this for a second, you can understand why: a radiator at high temperatures does generate some steam inside. Steam builds up, leading to pressure which was trying to vent through the pinhole. At one point it just got so hot and the pressure was so high the radiator gave way and cracked. Not bad, actually, for a 16 year old radiator.

The radiator was very easy to take out (collect your coolant properly! I let it run and later found squirrels drinking from it. If you don't want to chase squirrels all day collect it properly.) All-in all it would have taken me about an hour to replace.

Not a huge deal, RockAuto was willing to ship a new radiator to me for $95 (everything included). But time was of the essence, so I decided to go to Advance instead. Their website said a new radiator was $127, but the in-store price was $137 ("Yup, that's the store price" the sales associate told me when I asked why the bill was so high). I guess I was willing to pay $30 more, but $40 was starting to push it, especially if you consider the $60 towing charge. Also the principle of the matter didn't sit well with me. I contacted Advance about this (to bring it to their attention, not to demand a refund) and they got back to me on this, apologising for the incident and offering a gift card. Oh, and make sure you get the right radiator for your car (manual vs automatic, not the same!!), which set me back another day (plug any extra holes with silicone).

You should know this is unlikely to happen in an MG radiator, mainly because it's entirely metal. Though pin-hole leaks can happen, pressure will not build up the same way it did in my Altima. A good radiator cap should prevent any explosions, which should also be minor seeing as metal is much stronger than plastic (and a pin-hole will remain as such for much longer).

They really don't make things the way they used to.

Wednesday, August 5, 2009

A Sad Day for MG Enthusiasts

I was very shocked to find out yesterday that University Motors, known for its excellent MG self-help videos, is shutting down. To quote the website:

University Motors will cease fulltime business on Wednesday, July 1 st , 2009 , after 34+ years of service to the MG community. When our Governess promised in her 2006 State of the State Address that "In five years, you're going to be blown away by the strength and diversity of Michigan 's transformed economy," little did we imagine that it would be our own business that would be demolished in the ensuing economic storm.
John Twist's videos proved invaluable during those shaky first months when I really had no idea what I was doing. (This MGB is the first car I've ever really worked on.) It's a sad day and a real shame that we have to see something so wonderful go away. It's odd, because I always figured it'd be there. At some point I even planned on going to Ada, Michigan, to get something done, just to say I went there.

Luckily the videos will always be there, thanks to Youtube. Mr Twist always uploaded his videos to Youtube, that will keep a permanent record of it. I'm not too sure about how long the website will stay in existence, so I've copied the technical videos portion and put it on my server as the video organisation goes lost on Youtube: The original is here, mine is here.

Though there are many MG help guides online, very few are as clear as the University Motors videos. Most give general instructions but don't actually stop to give a good explanation of how things work. And, much to my annoyance at first, many are written in technical jargon or with details left out (such as, where's spark plug 1?) which rendered them useless for me. Haynes manuals and such are convoluted with too much information, unless you know exactly where to look. University Motors was a great place for a beginner like me to start.

The goal of this blog was to help other people in my situation get started by speaking in a very non-technical manner, which I hope I've somewhat accomplished. John Twist has accomplished this with his excellent series of MG technical videos.

Monday, August 3, 2009

Oil warning

I just found this article online about automotive oils. If you own an old car, you should care a lot about this:

http://www.mgtoronto.com/pdf/Tech/Oil.pdf

Apparently not just our fuel has become more environmentally friendly, but also our lubrication oils. Unfortunately, as with the added ethanol (that's not exactly environmentally friendly either...), the new oils also do significant damage to your car, more specifically to your camshaft and lifters. The oils lack certain 'pollutants', and the new materials replacing them seem to eat away at our cam shafts. This affects pretty much all oils, except certain brands. Redline Oil still makes racing oil (non-EPA approved, which is why it's still good) that you can find in the 10W20 etc. varieties. Castrol 20W50 is still OK as well, but not their other oils, which I have been using.

Here's a list from the article linked above:
  • Castrol: GTX 20W-50, GTX Diesel 15W-40, GTX High Mileage 20W-50, HD 30, HD 40,
  • Syntec Blent TRUCK 1 5W-40 (Semi-synthetic), Tection Extra 1 5W-40, Hypuron S 1
  • 5W-40, TWS Motor sport 10W-60 (Synthetic).
  • Redline: 10W-40, 10W-40 (Synthetic oils)
  • Valvoline: Racing 20W-50
People should also know that the addition of ethanol in fuel results in gaskets and rubber being eaten away prematurely, as well as a higher running temperature (which results in poor mpg's and early engine wear). If anyone knows a place that sells ethanol-free gas please let me know.

Once again I'm pissed at treehuggers that won't let me drive my car, when the real demons are:
  1. The energy industry (coal, gas for power? seriously? are we still in the 19th century??)
  2. The commercial transportation industry (diesel trucks with NO emissions regulations driving hundreds of miles daily,diesel trains, a giant presidential limo that gets less mpg than a 70s Buick)
  3. Agriculture (cows farting is more polluting than beltway traffic. I dunno, stick a cat conv. on their backs or something...)
  4. Real clunkers that are still on the road (but hell, I'll defend their right to drive till I die)
Anyway, enough politics. I'll be getting back to MG stuff soon. In the meanwhile I'm trying to get some body work done.

And feel free to check out my twitter account for more ramblings such as the one above: mgFreak

Monday, July 27, 2009

How to care for your car...

I just found this PM article on Google Books detailing how to care for your car ... in 1980. Most things apply to my '77 MGB, so I thought I'd share with people. They list 50 things people should do to keep your car running, such as (detailed instructions on) testing engine vacuum, cleaning the exhaust system, checking and maintaining the emissions system (which is actually quite interesting since most of those things have changed now)...

http://books.google.com/books?id=D9oDAAAAMBAJ&lpg=PP1&pg=PA139

Why don't they publish articles like this anymore?? Is it me, or have we as a general public become so dumb we can't find detailed technical articles in popular magazines anymore?

Sunday, July 12, 2009

Carburettor Madness Part II (pictures this time)

  • Carburettor (Weber DGV) fine-tuning
  • How to adjust the idle speed screw, the long way (when all else fails)
  • Actually got to drive around the neighbourhood for once, reliably.
  • Managed 60 mph, easily (couldn't go over 30 before...)
  • Fixed rough idle
Last time I discussed some general things concerning Weber DGV's and MGB's. I did some more fine-tuning today and learned that the 1.5 turns out on the idle mixture, as suggested by the webpage I discussed last time (by the way, still the best Weber DGV tuning page I've found) was not enough. I'm at about 2.25 turns out now which seems to be necessary to keep things running well (possibly due to the Peco header). The idle mixture screw is the one on the bottom of the carb, closest to the intake manifold (in an image further below I show where the idle mixture screw leads to). It's not the easiest screw to get to, but with some persistence you can get to it.

Much more frustrating is the idle speed screw, which is conveniently located in a completely inaccessible position while the carb is mounted (this may have been fixed on newer Webers). I found another screw next to the choke that links some stuff to that screw, and so in essence you can directly adjust the idle speed screw from there. I haven't tested the long-term effects of this, and I could be completely wrong, so if you try this be careful. The screw I'm talking about is shown in the picture below. Note that it is not directly attached to the choke, and as far as I can tell only affects how far the choke opens, but has a larger impact on the throttle plate.


My carb was so far out of wack I had to visually inspect the idle speed screw and the location of the throttle. When you turn the carb upside-down and look in the shafts you should be able to see three holes (open the throttle; see image below). These holes are outlets of various fuel circuits, and are activated based on how open the throttle is (interestingly, note that the secondary shaft only has two holes which are only activated when you're really flooring the accelerator; not shown).


I adjusted the idle speed screw directly linked to the throttle (so, not the screw near the choke as described above) so that the right hole, the 'highest' of the three holes, is just covered. The image below shows the right hole just peeking out, and thus how you should not have things. Make sure you cover that hole entirely. Put the whole thing back together, and make fine adjustments from the screw near the choke.


In a previous post I called the Peco exhaust noisy and unpleasant, leaving me with a ringing in my ear afterwards. Having properly adjusted the carb the sound, though still rather rough, was pleasant in the sort of roar one expects from a performance vehicle. Idle was very quiet, full throttle ear-deafening, in between pleasantly throaty. I bought this exhaust for it's performance aspects (which I have already noted - it works), but if you're looking for a comfortable drive I wouldn't recommend this.

Sunday, June 28, 2009

Carburettor Madness

  • Rebuilt the carburettor (Weber DGV)
  • Fixed fast idle
  • Got normal gas mileage (~23 mpg instead of 7)
  • Misfiring and backfiring resolved
Diligent readers will have noticed that it's been a while since I've last posted. There are various reasons for this -work, travel, family, etc, I'm writing this in Poland- but the most pressing one would have to be that when I replaced the B's exhaust, as described in the previous post, I killed the car.
It just so happens that the various systems of this B were working together in perfect harmony. I was always aware that the engine was running rich (7mpg is not very good, not even for an old MG), and that the exhaust had a massive gap under the hood and was sending exhaust fumes into the cabin. But I didn't know that the exhaust gap was indicative of a clog further down the line, and the exhaust fumes not being vented were choking the engine, which was compensated for by having a richer fuel mixture. When I replaced the exhaust system the engine was free to breath again, and the excess fuel was burning off as it should. However, this resulted in an engine refusing to go lower than 3000 rpm (and would stay high if you tapped the accelerator), an exhaust manifold turning bright orange, and flames shooting out the carburettor and the muffler (worse than before). My car was shitting itself while throwing up, but still devouring gas. It was bad.

There were several problems with the carburettor after I rebuilt it, mostly linked to the previous owner not having the right settings and overcompensating for the asphyxiated engine. Rebuilding a Weber is quite straight forward (I bought a manual but have yet to read it); essentially just grab a screw driver and pull stuff out. In a next post I will post pictures with descriptions (once again, I'm in Poland right now). Here's what I've learned, and some tips on what to do when rebuilding your carburettor (specifically, the Weber DGV):
  • Unless you really need to change everything, don't bother with a rebuild kit. Buy the gaskets separately, and get all the rest from a local hardware store. Rebuild kits are about $35 for stuff you can get for less than $15. Also, in my case the parts were of inferior quality (previously metal parts are now plastic or even paper!). This brings me to ...
  • Buy a new power valve. I guarantee you, if it wasn't already broken you've broken it now. A broken power valve is what caused my engine to race and not idle below 3000 rpm (the power valve activates circuits supplying fuel for conditions requiring more fuel than at idle). It's an easy replacement I highly recommend, but is not included in most rebuild kits. It costs about $20.
  • If your car comes with a vacuum advance vacuum port on the distributor, keep in mind that ported vacuum from a Weber acts differently than manifold vacuum, the system the distributor was designed for. The engine goes crazy when I connect the vacuum port from the Weber to my stock distributor (the original one with an amplifier in my '77). The engine runs fine without it, so I'm leaving it disconnected for now. UPDATE: This does not happen anymore. In fact, connecting the vacuum port to the distributor actually reduced misfiring. I think there were too many other problems at the time I wrote this article. Alternatively, you could buy a different intake manifold (a non-Weber manifold) which has more vacuum manifold ports (you'll see what I mean if you care about vacuum). As I'm replacing most things, I'm replacing the distributor entirely at some point.
  • Do all fine-tuning before putting the carb back on. On my B the fine-tuning screws face the wrong way, towards the engine, making fine-tuning a pain in the butt. Also, with the carb out you can see what the fast idle screw is doing to the throttle, and how it's placed with respect to the fuel lines of the various circuits. I'll go into more details on this later.
  • The float was another source of frustration. Too high, and fuel will spill over the holding tank and go everywhere, which could result in a mini aurora-borealis under the hood. Too low, and the car will never run on it's own. Weber manuals describe correct heights of floats, and I strongly recommend you stick to them. Unfortunately my float did not appear in any manual, and as it was a brass one (not plastic like the new ones) I wanted to keep it. So I just fiddled with it a few times till fuel wasn't overflowing or starving the engine. This took a while, and was very frustrating.
  • British fuel pumps are garbage. One minute they're too weak, the next they're so powerful the intake needle won't close and fuel shoots out everywhere. I recommend buying a fuel pressure regulator and setting it for 3.5 psi.
  • WEAR SAFETY GOGGLES!!!! Flames shooting out the intake almost cost me all my facial hair. I guess I'd recommend at the very least keeping the air filter and cover on while doing any work with an engine running... Also, I had to often remove the fuel line while it still had some pressure, resulting in fuel shooting out. Fuel in your eye can result in blindness! Wear goggles! (Well, atleast while doing stuff with fuel and oils.)
The trouble with carburettors is that they are very fine-tuned pieces of equipment. Screws slightly off can result in complete chaos. For example, if your mixture is too lean the engine won't start or stay on at all. Too rich, and you could blow off more than just your eye-brows. In either case, long term usage of bad tuning can result in severe engine damage (slightly off is OK).

General Weber tuning instructions can be found here. These are very good instructions that helped me get things started again. Remember to adjust the timing after this.

Some documents of interest:
Quick trouble shooting guide (did not help me)
Complete Weber installation guide

Note (from below): These files and links are posted for informational purposes only. No profit what so ever is generated from these files. These files can be found everywhere on the internet and are simply collected here for reference purposes.

UPDATE: I have done many more things to the carburettor. Click on the 'weber' label on the right for all updates.

Monday, May 18, 2009

New exhaust, new woes

  • Installed new complete Peco exhaust system
  • No more exhaust fumes inside the cabin
  • Engine can breath freely
I plan on eventually turning this car into a real performance car, so the first step is always to put in a decent exhaust. The previous exhaust had bulged open at the end of the exhaust header and was letting exhaust fumes into the cabin, which led me to believe that it may be clogged somewhere (which is not surprising if you consider how much time this car has spent under a tarp over the past few years). So I decided to pull it and replace the whole thing.The exhaust header, though rusted, was still in great shape. I thought of just sanding it down and repainting it, but had a hard time finding head pipes to connect it to a new exhaust. The rest of the exhaust was in good shape (barely any rust), but seemed clogged. In the end I bought a new Peco header (see image above) with the rest of the exhaust system, a 2-inch straight through system (and a big FU to the EPA). Note that in Maryland classic cars are exempt from state emissions testing, and so removal of the catalytic converter (if there is one, mine did not have one) is legal. This is not the case in California, where pretty much any exhaust or emissions modification is illegal. So check your state regulations to make sure it is as cool as Maryland :-) (if you're in a southern state or Michigan, you're good to go).

Update: It has been brought to my attention that removing the catalytic converter is illegal by federal law. Though Maryland is not going to check (assuming you have historic tags), you would apparently still be breaking the law if you remove the converter. A car must always retain its originally installed emissions regulation equipment, even if it fails (!). So draw your own conclusions...

There are several considerations when purchasing an exhaust system, but it generally boils down to whether you want a comfortable or a sporty ride. My Peco system is incredibly loud, and after a short drive my ears were ringing (this will probably improve when I put in sound insulation). It only has the one straight-through muffler, so not really ideal for comfortable riding. If you're looking for a comfortable ride you'll need a decent muffler or a 2-muffler setup (more common on the MGB). If you're a tree-hugger you'll also want to throw in a cat convertor.

When picking a header one should pick one with the least amount of curves, thus improving the flow of gasses. More angles mean a slower flow, though this is generally a very modest decrease. On the MGB there are only 3 exhaust ports for a 4 cylinder car, which seems wrong. This was a conscious choice by the engineers to save manufacturing costs, but was designed in such a way that with it shouldn't impede exhaust fumes too much, however, efficient expulsion of those fumes is very important. The centre two exhaust valves are connected (the so-called 'siamese' system) and go out through one pipe, so naturally that pipe should be larger than the other two (which each serve one valve respectively). The Peco header has a larger centre port which merges with the other two towards the end of the pipe, thus enabling a better flow of exhaust fumes. There are MGB engine upgrades available that allow for four intakes on one side and four exhausts on the other side of the engine (but be prepared for some machining).
A major issue when picking exhaust systems for the MGB is picking the right setup. Over the years the exhaust and intake system changed many times, so a 1980 MGB will have a completely different setup to a 1965 MGB (and I mean radically different). Later models have catalytic converters (under the hood, not in the back) and different intakes. I would strongly recommend retrofitting your car to the old-fashioned exhaust system as I did, but you will also most likely need to change your carburettor and intake manifold for this. This allows for a better freer flow, and will bring your engine closer to the original 98 hp it once had. Consider the Weber DGV (downdraft) if you do this conversion.

The exhaust arrived and I set out to install it, which is a very simple procedure in principle. As it differs on most cars I'm not going to give detailed instructions. Rather, just take a look at your old exhaust and figure out a way of putting the new one in. Don't know what to do? Just start taking it out, and make sure the new exhaust system fits snugly and doesn't move. If it is designed for the MGB it will fit, you just have to keep trying. Here are some tools you will need:
  • An electric saw (to saw through pipes and bolts that won't give way)
  • A wrench set
  • Ramps !!! (I used jack stands and a floor jack, which I do not recommend)
  • WD-40
  • Muffler clamps (to hold together the pieces of the exhaust system; typically not included)
  • A friend to hold stuff
  • Patience. Lots and lots of patience. This took me 2 days and was incredibly frustrating.
Note that on some exhaust systems, as was the case on mine, the intake header has to be in place before you put in the exhaust header. Use a mallet (or a hammer if you get fed up like I did) to get everything in place. The Peco seemed to touch the rear suspension, but that was because I had the pipes in the wrong order, so be mindful of that.
Now, I was planning on posting a video showing the before and after sounds. Unfortunately my carburettor is acting up, and the damn car won't rev lower than 3000rpm. As I had the intake out anyway I thought I'd rebuild the carburettor. Apparently I did something wrong. As soon as I figure out what I did wrong I'll post it and my solution. In the meanwhile, if anyone has any suggestions....

Thursday, May 7, 2009

Keys

  • New keys!!
If you live in the mid-Atlantic region like I do, you'll have noticed that the only spot of sun we've had in the past week and a half was for a few hours yesterday morning. Naturally, for the gradstudent who doesn't have a garage, this is disastrous. As such I have now piled up parts I plan to install over the next few weeks, such as a brand new 2-inch straight-through exhaust (with accompanying manifold) and a carb rebuild kit. More on this as soon as the weather picks up.

One new part that arrived that I was able to test out was a set of keys I ordered. You see, when I got the car I didn't have any keys at all, so the car was left unlocked pretty much all the time, and I used a screw-driver to start the car (the key had broken off in theignition). In an earlier post I described how I had to drill out the lock on the gas cap. I really needed new keys but didn't know what to do.

Taking the trunk lock off and bringing it to a (Sears and Strosniders) lock smith, they told me they couldn't make keys for it. Of course, they were just being lazy as it's pretty easy to do. I gave up and started looking up new locks to install, but much to my dismay it seemed like I'd be putting down close to $100 for a new set of locks! Which is outrageous when you consider that I already have good locks, I just need keys. I left it at that and hoped nobody would do anything to my car.

Much later I finally realised that there's such a thing as a lock code, a number that defines what key combination you need. Further, depending on the model of your car you can look up what type of key you need, attach your lock number to it, and the locksmith can make you a brand new key. For the 1977 MGBs you're looking at an FS type key, with three numbers following it describing the combination. Ignition keys are of type AA. More info here.

Great, I found the key combination (it was printed on the door locks and on the trunk lock, see this), and now all I had to do was order the keys, which I did from here. I chose Keys4Classics.com because they have a more personal service, so despite being on the other side of the world your order will be correct. You can even send them a photo of your key (or part of your key) and they'll reproduce it. Keep in mind, though, that they are located in Australia (but shipping doesn't take much longer, about a week total for me).

When you finally have your new keys and are ready to test them out, keep the following in mind:
  • Make sure the lock is sound, not completely rusted, and not loose. I didn't check my trunk lock, which was loose from the last time I had opened it, and ended up almost permanently locking the trunk. I was able to jimmy it open without drilling the lock, but I was freaking out.
  • Use a lubricant on the locks and the general locking mechanism. If your locks haven't been used in ages, like mine, they will need some lubrication or you stand a chance of breaking the whole thing.

Sunday, April 26, 2009

Good Timing

  • Adjusted the timing
  • Partially fixed misfiring problem
  • Gained more engine power (timing was way off)
  • Figured out how to set timing
Adjusting the timing is another one of those simple miracle cures that can really improve things. Just to name a few, the engine won't sound like a tractor anymore, emissions will improve, fuel economy will improve, no more misfiring, etc. It's also one of the easiest things you can do ... that is if you know what to do.

For a long time I didn't know what to do, and so kept postponing this. I finally took the plunge this weekend and figured out how to check and adjust timing. Sure enough, the timing was off (as if the misfiring hadn't told me that already).

First off, you'll need some equipment. You'll need a timing gun (see image below), a 12 V automotive source for the timing gun (car battery; from another car if you have an MGB), a 12 mm wrench, and some white-out (with a brush works best).


The 1977 MG B specs state that at idle (850 rpm) the timing mark should be at 5 degrees BTDC (before top dead centre), and for 1500 rpm at 10 degrees BTDC. This could be different on your car, so check before doing anything by reading a service manual. On my car I found the instructions on a lable under the hood (where other emissions info such as spark plug gaps etc is found).

Update: If you use a weber (like I do) you'll need to set idle to 14 BTDC. However this differs from car to car. Mine uses a free-flow Peco exhuast, so 14 is correct for me, but if you still have a catalytic converter you will probably need a lower offset.


Finding TDC is not the most obvious thing on my car. One can generally locate it as the 'odd one out' of the teeth that make up the timing alignment. Usually it's slightly bigger, however note that this differs on MGBs (based on the year they were built). The image above shows the situation on my car, the 'teeth' illustrated by #1 and the notch in the front wheel by #2. I used white-out to make them more clear. TDC is - I guessed correctly - the right most tooth. As per the specs of the car, at idle I need to be at 5 degrees BTDC (the 2nd tooth from the right), and at 1500 rpm at 10 degrees (centre tooth). All teeth have a 5 degree separation. On some MGBs these teeth are at the bottom of the engine.

What you do is simply adjust the distributor by turning it left and right till the notch on the wheel lines up with the 5 degree mark on the teeth (at idle). Do this by hooking up the timing gun to spark plug 1, the plug closest to the front of the car (the power cable on mine wasn't long enough to go the the battery, so I had to bring my other car next to it to connect it to a source), and aiming it at the teeth. To turn the distributor loosen the nut holding the sleeve of the distributor to the engine block (#3 in the image below).


And the result is... (idle, 1500 rpm, then idle again)


Note that all this should be done after driving the car around for atleast 5 minutes and everything is at running temperature. The timing marks on my car are on top of the bottom wheel (drive pulley?), but on older models it is often underneath.

Thanks to MG's great battery placement, my timing setup looks like this:
Get a friend to hold the gun.

UPDATE: I'd like to say that the top picture was a joke, but actually I was just being an idiot. A much easier timing gun setup is: connect the ground lead to a bare part of the frame (for example, that thing that sticks out of the engine where the air pump used to be), and the hot lead to the bottom fuse (ONLY TOUCH THE BOTTOM FUSE). The images below (taken with my phone... sorry) should explain.


Tuesday, April 21, 2009

Great weather

  • Resolved frustration at car and life in general.
The weather this weekend was perfect, so rather than spend hours working on the MG I decided to instead sit back and enjoy what I've done so far. So, no post this time, other than letting you know I enjoyed the weather. Also I recommend other enthusiasts to do the same.


Sunday, April 5, 2009

Rear (drum) brakes

  • Replace wheel (brake) cylinders
  • Resolved horrible braking power
  • Stopped losing brake fluid
I think that at this point I don't need to make any more jokes as to how this project is turning out to be one giant Pandora's box. Fix one thing, get ten more problems. Clock starts working, tach dies. Etc. So I'll just cut to the chase: fixed rear brakes, passenger side headlight doesn't work on regular mode (replacing bulb didn't fix it).

Despite changing the front brakes, I still wasn't stopping in a reasonable distance. After removing one of the rear wheels, the grease and liquids all over the place quickly revealed that the wheel cylinder was broken and severely leaking fluids. This is contrary to my original thought, that it had locked up. The other wheel cylinder was fine, though very rusty, so we replaced it anyway.

There are two ways to do this. The first way details the long, tedious (but correct), way. The second is the short-cut I recommend to anyone who knows what they're doing (Takes about 20 minutes instead of an hour and half). Also keep in mind to use something to hold the brake pedal up. I attached it to my steering wheel using a bungie cord.

1. Remove wheels, jack up car (rest floor jack on differential, I rested the jack stands on the reaf suspension leafs).
2. Use a 7mm hex bit to remove the two screws holding the brake cover. I had to tap the cover gently with a hammer to get it off.
3. Remove the two retaining springs (see image below - click to enlarge).
4. Remove the top spring (see image above). The shoes will start coming lose here.
IMPORTANT: Remember which shoe goes where!!! Make a note of all holes and pins in their appropriate place, so when you put everything together later you know what you're doing! You can severely damage your brakes if you do this wrong!!!
5. (You don't really have to do this, we didn't) Remove the bottom springs and take off the shoes.
6. Unscrew the nut holding the brake line to the wheel cylinder. Keep in mind that you'll be losing brake fluid here, so put a pan underneat the wheel.
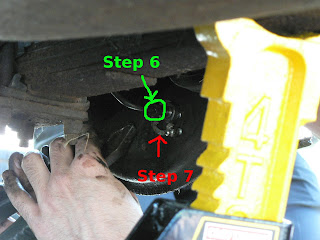
7. Remove the retaining clip on the back side (where the nut was).
8. Remove the wheel cylinder. Note that there are three holes where the cylinder was attached: one for brake fluid, a bleed valve, and a pin to hold it in place.
9. Take the new wheel cylinder and pour brake fluid in it. Squeeze the outsides together in bursts to let out any air still in the cylinder. You do not want air anywhere in your brake system.
10. Install the new wheel cylinder, keeping the three holes and what goes where in mind. We had to use a hammer to nudge it in properly (the holder pin was a tad larger). Attach the new clip (we weren't able to, so we just reused the old one) and reconnect the brake-line nut.
11. Reverse the installation, bleed the line, and you're done! Keep in mind that the reverse installation takes a while, and depending on how many springs you removed, can be rather tedious.

I also cleaned the brakes before I reassembled everything. One should generally use brake cleaning fluid for this, lacking that I used carb cleaner.

Rather than do all this you can also try to jimmy out the shoes without removing any springs (pull them apart so they go over the wheel cylinder), and wedge the wheel cylinder out. We did this for the second brake, which worked out fine and took less time. (This is the second method)

John Twist at University Motors has a video on how the brakes look and work.

Many thanks to my girlfriend's father, thanks to whom the whole installation could be done in less than 3 hours. And of course my girlfriend for taking the pictures.