Sunday, April 26, 2009

Good Timing

  • Adjusted the timing
  • Partially fixed misfiring problem
  • Gained more engine power (timing was way off)
  • Figured out how to set timing
Adjusting the timing is another one of those simple miracle cures that can really improve things. Just to name a few, the engine won't sound like a tractor anymore, emissions will improve, fuel economy will improve, no more misfiring, etc. It's also one of the easiest things you can do ... that is if you know what to do.

For a long time I didn't know what to do, and so kept postponing this. I finally took the plunge this weekend and figured out how to check and adjust timing. Sure enough, the timing was off (as if the misfiring hadn't told me that already).

First off, you'll need some equipment. You'll need a timing gun (see image below), a 12 V automotive source for the timing gun (car battery; from another car if you have an MGB), a 12 mm wrench, and some white-out (with a brush works best).


The 1977 MG B specs state that at idle (850 rpm) the timing mark should be at 5 degrees BTDC (before top dead centre), and for 1500 rpm at 10 degrees BTDC. This could be different on your car, so check before doing anything by reading a service manual. On my car I found the instructions on a lable under the hood (where other emissions info such as spark plug gaps etc is found).

Update: If you use a weber (like I do) you'll need to set idle to 14 BTDC. However this differs from car to car. Mine uses a free-flow Peco exhuast, so 14 is correct for me, but if you still have a catalytic converter you will probably need a lower offset.


Finding TDC is not the most obvious thing on my car. One can generally locate it as the 'odd one out' of the teeth that make up the timing alignment. Usually it's slightly bigger, however note that this differs on MGBs (based on the year they were built). The image above shows the situation on my car, the 'teeth' illustrated by #1 and the notch in the front wheel by #2. I used white-out to make them more clear. TDC is - I guessed correctly - the right most tooth. As per the specs of the car, at idle I need to be at 5 degrees BTDC (the 2nd tooth from the right), and at 1500 rpm at 10 degrees (centre tooth). All teeth have a 5 degree separation. On some MGBs these teeth are at the bottom of the engine.

What you do is simply adjust the distributor by turning it left and right till the notch on the wheel lines up with the 5 degree mark on the teeth (at idle). Do this by hooking up the timing gun to spark plug 1, the plug closest to the front of the car (the power cable on mine wasn't long enough to go the the battery, so I had to bring my other car next to it to connect it to a source), and aiming it at the teeth. To turn the distributor loosen the nut holding the sleeve of the distributor to the engine block (#3 in the image below).


And the result is... (idle, 1500 rpm, then idle again)


Note that all this should be done after driving the car around for atleast 5 minutes and everything is at running temperature. The timing marks on my car are on top of the bottom wheel (drive pulley?), but on older models it is often underneath.

Thanks to MG's great battery placement, my timing setup looks like this:
Get a friend to hold the gun.

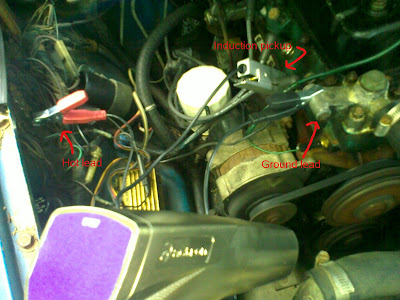
UPDATE: I'd like to say that the top picture was a joke, but actually I was just being an idiot. A much easier timing gun setup is: connect the ground lead to a bare part of the frame (for example, that thing that sticks out of the engine where the air pump used to be), and the hot lead to the bottom fuse (ONLY TOUCH THE BOTTOM FUSE). The images below (taken with my phone... sorry) should explain.
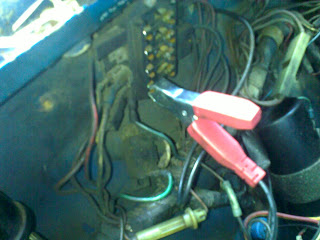

Tuesday, April 21, 2009

Great weather

  • Resolved frustration at car and life in general.
The weather this weekend was perfect, so rather than spend hours working on the MG I decided to instead sit back and enjoy what I've done so far. So, no post this time, other than letting you know I enjoyed the weather. Also I recommend other enthusiasts to do the same.


Sunday, April 5, 2009

Rear (drum) brakes

  • Replace wheel (brake) cylinders
  • Resolved horrible braking power
  • Stopped losing brake fluid
I think that at this point I don't need to make any more jokes as to how this project is turning out to be one giant Pandora's box. Fix one thing, get ten more problems. Clock starts working, tach dies. Etc. So I'll just cut to the chase: fixed rear brakes, passenger side headlight doesn't work on regular mode (replacing bulb didn't fix it).

Despite changing the front brakes, I still wasn't stopping in a reasonable distance. After removing one of the rear wheels, the grease and liquids all over the place quickly revealed that the wheel cylinder was broken and severely leaking fluids. This is contrary to my original thought, that it had locked up. The other wheel cylinder was fine, though very rusty, so we replaced it anyway.

There are two ways to do this. The first way details the long, tedious (but correct), way. The second is the short-cut I recommend to anyone who knows what they're doing (Takes about 20 minutes instead of an hour and half). Also keep in mind to use something to hold the brake pedal up. I attached it to my steering wheel using a bungie cord.

1. Remove wheels, jack up car (rest floor jack on differential, I rested the jack stands on the reaf suspension leafs).
2. Use a 7mm hex bit to remove the two screws holding the brake cover. I had to tap the cover gently with a hammer to get it off.
3. Remove the two retaining springs (see image below - click to enlarge).
4. Remove the top spring (see image above). The shoes will start coming lose here.
IMPORTANT: Remember which shoe goes where!!! Make a note of all holes and pins in their appropriate place, so when you put everything together later you know what you're doing! You can severely damage your brakes if you do this wrong!!!
5. (You don't really have to do this, we didn't) Remove the bottom springs and take off the shoes.
6. Unscrew the nut holding the brake line to the wheel cylinder. Keep in mind that you'll be losing brake fluid here, so put a pan underneat the wheel.

7. Remove the retaining clip on the back side (where the nut was).
8. Remove the wheel cylinder. Note that there are three holes where the cylinder was attached: one for brake fluid, a bleed valve, and a pin to hold it in place.
9. Take the new wheel cylinder and pour brake fluid in it. Squeeze the outsides together in bursts to let out any air still in the cylinder. You do not want air anywhere in your brake system.
10. Install the new wheel cylinder, keeping the three holes and what goes where in mind. We had to use a hammer to nudge it in properly (the holder pin was a tad larger). Attach the new clip (we weren't able to, so we just reused the old one) and reconnect the brake-line nut.
11. Reverse the installation, bleed the line, and you're done! Keep in mind that the reverse installation takes a while, and depending on how many springs you removed, can be rather tedious.

I also cleaned the brakes before I reassembled everything. One should generally use brake cleaning fluid for this, lacking that I used carb cleaner.

Rather than do all this you can also try to jimmy out the shoes without removing any springs (pull them apart so they go over the wheel cylinder), and wedge the wheel cylinder out. We did this for the second brake, which worked out fine and took less time. (This is the second method)

John Twist at University Motors has a video on how the brakes look and work.

Many thanks to my girlfriend's father, thanks to whom the whole installation could be done in less than 3 hours. And of course my girlfriend for taking the pictures.

Wednesday, April 1, 2009

NEW PAINT JOB!!!!

Well, folks, I finally did it. I finally got a new paint job!!!!!! I even had them put in custom racing stripes and aracing number. Later I took it into a field for some shots. Take a look (click to enlarge):


Snazzy.


Happy April Fools day.