- Replace wheel (brake) cylinders
- Resolved horrible braking power
- Stopped losing brake fluid
Despite changing the front brakes, I still wasn't stopping in a reasonable distance. After removing one of the rear wheels, the grease and liquids all over the place quickly revealed that the wheel cylinder was broken and severely leaking fluids. This is contrary to my original thought, that it had locked up. The other wheel cylinder was fine, though very rusty, so we replaced it anyway.
There are two ways to do this. The first way details the long, tedious (but correct), way. The second is the short-cut I recommend to anyone who knows what they're doing (Takes about 20 minutes instead of an hour and half). Also keep in mind to use something to hold the brake pedal up. I attached it to my steering wheel using a bungie cord.
1. Remove wheels, jack up car (rest floor jack on differential, I rested the jack stands on the reaf suspension leafs).
2. Use a 7mm hex bit to remove the two screws holding the brake cover. I had to tap the cover gently with a hammer to get it off.
3. Remove the two retaining springs (see image below - click to enlarge).
 4. Remove the top spring (see image above). The shoes will start coming lose here.
IMPORTANT: Remember which shoe goes where!!! Make a note of all holes and pins in their appropriate place, so when you put everything together later you know what you're doing! You can severely damage your brakes if you do this wrong!!!
5. (You don't really have to do this, we didn't) Remove the bottom springs and take off the shoes.
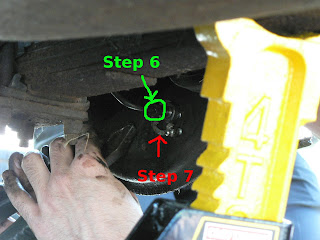
6. Unscrew the nut holding the brake line to the wheel cylinder. Keep in mind that you'll be losing brake fluid here, so put a pan underneat the wheel.

7. Remove the retaining clip on the back side (where the nut was).
8. Remove the wheel cylinder. Note that there are three holes where the cylinder was attached: one for brake fluid, a bleed valve, and a pin to hold it in place.
9. Take the new wheel cylinder and pour brake fluid in it. Squeeze the outsides together in bursts to let out any air still in the cylinder. You do not want air anywhere in your brake system.
10. Install the new wheel cylinder, keeping the three holes and what goes where in mind. We had to use a hammer to nudge it in properly (the holder pin was a tad larger). Attach the new clip (we weren't able to, so we just reused the old one) and reconnect the brake-line nut.
11. Reverse the installation, bleed the line, and you're done! Keep in mind that the reverse installation takes a while, and depending on how many springs you removed, can be rather tedious.
I also cleaned the brakes before I reassembled everything. One should generally use brake cleaning fluid for this, lacking that I used carb cleaner.
Rather than do all this you can also try to jimmy out the shoes without removing any springs (pull them apart so they go over the wheel cylinder), and wedge the wheel cylinder out. We did this for the second brake, which worked out fine and took less time. (This is the second method)
John Twist at University Motors has a video on how the brakes look and work.
Many thanks to my girlfriend's father, thanks to whom the whole installation could be done in less than 3 hours. And of course my girlfriend for taking the pictures.

2 comments:
This was of great help for me, Thanks!
Ger, Maastricht, The Netherlands
Very glad to hear it! Thanks for posting!
Post a Comment