Sunday, April 5, 2009

Rear (drum) brakes

  • Replace wheel (brake) cylinders
  • Resolved horrible braking power
  • Stopped losing brake fluid
I think that at this point I don't need to make any more jokes as to how this project is turning out to be one giant Pandora's box. Fix one thing, get ten more problems. Clock starts working, tach dies. Etc. So I'll just cut to the chase: fixed rear brakes, passenger side headlight doesn't work on regular mode (replacing bulb didn't fix it).

Despite changing the front brakes, I still wasn't stopping in a reasonable distance. After removing one of the rear wheels, the grease and liquids all over the place quickly revealed that the wheel cylinder was broken and severely leaking fluids. This is contrary to my original thought, that it had locked up. The other wheel cylinder was fine, though very rusty, so we replaced it anyway.

There are two ways to do this. The first way details the long, tedious (but correct), way. The second is the short-cut I recommend to anyone who knows what they're doing (Takes about 20 minutes instead of an hour and half). Also keep in mind to use something to hold the brake pedal up. I attached it to my steering wheel using a bungie cord.

1. Remove wheels, jack up car (rest floor jack on differential, I rested the jack stands on the reaf suspension leafs).
2. Use a 7mm hex bit to remove the two screws holding the brake cover. I had to tap the cover gently with a hammer to get it off.
3. Remove the two retaining springs (see image below - click to enlarge).
4. Remove the top spring (see image above). The shoes will start coming lose here.
IMPORTANT: Remember which shoe goes where!!! Make a note of all holes and pins in their appropriate place, so when you put everything together later you know what you're doing! You can severely damage your brakes if you do this wrong!!!
5. (You don't really have to do this, we didn't) Remove the bottom springs and take off the shoes.
6. Unscrew the nut holding the brake line to the wheel cylinder. Keep in mind that you'll be losing brake fluid here, so put a pan underneat the wheel.
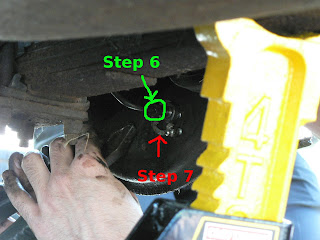
7. Remove the retaining clip on the back side (where the nut was).
8. Remove the wheel cylinder. Note that there are three holes where the cylinder was attached: one for brake fluid, a bleed valve, and a pin to hold it in place.
9. Take the new wheel cylinder and pour brake fluid in it. Squeeze the outsides together in bursts to let out any air still in the cylinder. You do not want air anywhere in your brake system.
10. Install the new wheel cylinder, keeping the three holes and what goes where in mind. We had to use a hammer to nudge it in properly (the holder pin was a tad larger). Attach the new clip (we weren't able to, so we just reused the old one) and reconnect the brake-line nut.
11. Reverse the installation, bleed the line, and you're done! Keep in mind that the reverse installation takes a while, and depending on how many springs you removed, can be rather tedious.

I also cleaned the brakes before I reassembled everything. One should generally use brake cleaning fluid for this, lacking that I used carb cleaner.

Rather than do all this you can also try to jimmy out the shoes without removing any springs (pull them apart so they go over the wheel cylinder), and wedge the wheel cylinder out. We did this for the second brake, which worked out fine and took less time. (This is the second method)

John Twist at University Motors has a video on how the brakes look and work.

Many thanks to my girlfriend's father, thanks to whom the whole installation could be done in less than 3 hours. And of course my girlfriend for taking the pictures.

Wednesday, April 1, 2009

NEW PAINT JOB!!!!

Well, folks, I finally did it. I finally got a new paint job!!!!!! I even had them put in custom racing stripes and aracing number. Later I took it into a field for some shots. Take a look (click to enlarge):


Snazzy.


Happy April Fools day.

Monday, March 30, 2009

University Motors

Many people have called me insane for attempting to restore this car, however they often fail to realise that the MG following is quite large: parts are easily available and quite cheap, numerous books and manuals have been written, and there is an extremely large fan base ready and willing to help (generally for free).

One of my references before I do any work is University Motors, that has an online database of videos on how to do things on MGs (B's mostly, but also some rarer models). I've checked out their videos on Youtube on several occasions and used them to find parts on the B. The videos are good for getting a rough idea on what to do - Mr Twist tends to go over things a bit quickly and the video quality isn't always that great - but can be invaluable if you don't know how to find top dead centre, start your car from under the hood, or even put the top down the right way. Occasiaonally they also show videos of strange problems, such as one where one of the shocks froze.

Check it out for some immediate help (that you can even access from your phone while working on the car, if necessary).

Monday, March 23, 2009

New Front Brakes!! Finally!!!

  • Changed front brake pads and rotors
  • Minor improvements in braking (much better results when I replaced the wheel cylinders)
  • Brake pads worn, reveal uneven calipers.


Several months ago my grandfather gave me the gift of safety in the form of reliable braking. Knowing quite well what happens if you don't hit the brakes on time (and a building is inconveniently in the way ;-) ), he advised me early on in this project that I wear my seatbelt and obey speed limits. When he heard about the B's poor braking he jumped on the occasion and bought me a set of new rotors and pads.

This was before I left on my trip, and after I got back the weather rather dismal for many weeks. Last weekend, about three months later, we finally had two days in a row of pleasant warm weather. Perfect weather for fitting new rotors and brake pads.

The following is a step by step guide on replacing both the rotors and the brake pads. The first time I did this took me about five hours to complete, the second time about an hour and a half. Be ready for some really dirty, greasy work, as well as many frustrations with pins. Also I would recommend keeping a pan under the caliper while working on it (to catch dripping brake fluid), and have a box nearby to rest the caliper on while working (so you don't stretch the brake line). I must also stress people use a floor jack and jack stands while working on any of this (I used to use the jack the car came with ... very very stupid).

1. Loosen the wheel lug nuts, raise the car, remove the wheel entirely.
2. Remove the two pins and two panels on the caliper holding back the pads. You'll have to play around a bit with the end of the pin: straighten it out to pull the pin out (see image on right).
3. Unscrew the bolts holding the outer caliper part, and set it aside. You'll probably lose some brake fluid doing this. Take out the brake pad attached to this part (see image on right).
4. Unscrew the bolts holding the inner caliper part, take it out and rest it on a box or something so the brake line isn't under pressure. Take out the brake pad.
5. Remove the grease cap off the wheel hub (yes, you need to remove the wheel hub to change the rotors). Use a screwdriver to pry it open.
6. Straighten the wheel hub pin and pull it out. This was by far the hardest part of the entire operation.
7. Remove the nut holding back the wheel hub. It's very loose, and you should be able to mostly use your fingers for this.
8. By gently pulling the rotor forward, take out the various components of the wheel hub and place them somewhere, keeping in mind in which order they came out (pin-bolt-washer-bearings). I strongly recommend you not let anything touch dirt, and that you not drop the bearings.
9. You can now (easily) pull off the rotor.
10. Place the rotor in a table clamp, and remove the four bolts and nuts (with washers) holding together the hub and the rotor.
11. Now take off the old rotor, attach the new one, and reassemble everything in reverse order.
UPDATE: Read this on the wheel bearings and how far to tighten the end nut. This is a safety issue! (Skip to the end to read the instructions if you don't feel like reading the story behind this discovery.)
12. When refitting the calipers, make sure the cylinders that press together to apply the brakes have been pushed back into the housing. An easy way to do this is to place your old brake pad on top of the cylinder and squeeze it together with a c-clamp. You'll see brake liquid oozing out. Be sure to install the new pads!
13. Make sure you bleed the brake system before using the brakes or reattaching the wheels! This is to remove all air from the brake lines. With the bleed valve closed, press down the brake pedal four times, holding it down the last time. Open the bleed valve, and close again. If brake fluid did not spout out in a decent stream you still have air in the lines, so repeat till this happens. Make sure you have enough brake fluid to start with or you'll just pump more air into the system.
14. Friction after putting in the new pads is normal. As long as you can still turn the rotor with your hands you're fine. By pressing the brakes you shouldn't be able to turn them anymore.
15. Now do the other side, and you're done!

The old pads were extremely worn, though they still had some life. This is probably why I had to push down so hard on the brakes; now I don't have to push down as hard on them to brake. However, braking is still not as good as it should be. I'm guessing the rear brakes have locked up (which is probably also why my parking brake doesn't work anymore), so I'll be looking into this soon. I'll probably be replacing the cylinders on the drum brakes (locking up is common).

The pads on the driver side were worn down at an angle, suggesting that an uneven amount of pressure was being applied. I'll have to look into this in future, and perhaps recalibrate or even replace the caliper. But that's for another time.

Many thanks to my grandfather for the parts, my friend Gautam for some much needed brute force help, and my girlfriend Luz for taking detailed pictures and assisting throughout the procedure (she's changed brakes many times before, and unlike me actually knew what to do).

Sunday, March 8, 2009

Spark plugs: another easy way to fix serious problems

  • Changed spark plugs and spark plug wires (Bosch)
Sluggish pick-up, tractor sounds, bad fuel burning, and mis-firing. These are all things possibly caused by bad spark plugs. Not surprisingly, my car featured all these exciting quirks, and as a result had a zero to sixty of about a year, and started with the reliability of an old Dell laptop (think: say nice words and it may start). After changing the spark plugs and wires, I now have slightly better performance! Also, the car starts on the first turn of the key! And best of all, the engine sounds like a car engine again!! I wanted to go on to change the timing, but had cut myself enough just changing the plugs so I left it for another time (and performance was good enough for now).

I'm not going to go into the details of how to change a spark plug here (on this car, any idiot could change them), however you should note that the bolt is not the standard spark plug size bolt. In fact, it's quite a bit larger and I had to use an adjustable wrench to get them out. Also the reader should note that I didn't have to gap the spark plug, as the spark plugs can be bought with the right gap nowadays (I wish I knew that before buying the gapping tool...).

Most notably, the mis-firing you see in an earlier blog (flames coming out of the carburetor) has now stopped entirely. This is due to the fact the old spark plugs were very oily (see image of one of my spark plugs below). Over time the spark kept reducing in size (due to crap build-up) till the spark was so small if didn't ignite the fuel anymore, resulting in excess fuel at times. At that point the slightest spark set of an enormous explosion that partially went out the carburetor. That's what I think happened, if anyone has any other suggestions please let me know as I'm just guessing here.

According to Haynes, this could be due to worn bores/piston rings, or valve guides, and sometimes occurs during the running-in period of the car (though only temporarily). Considering I recently changed the valve cover gasket (though I doubt this has anything to do with it) and don't drive very often, I'm going to be optimistic and say this is a temporary problem that has now been corrected.

So there we have a simple way of improving performance: change your spark plugs and spark plug wires. Baby steps towards getting back to (better than) factory settings.

Tuesday, February 10, 2009

A little cleaning can go very far

- Clean fuses, make lights (and other things) work

Uttering the loudest 'duh' of the century, I gazed upon the impressive sight that was all lights working on the B (well, except for the indicators). In the past only the headlights and the lights on the left side of the car worked, meaning that it would be illegal to drive at night and that I had a good chance of being pulled over at any time by a cop.

Where in the past I generally had several goals for the weekend and was only able to complete about half of one, this weekend I set one simple goal: fix the lights. Easy enough, I thought. I assumed that the bulb had either burned out, the contacts were dirty, the wires broken, .... . Worst case scenario I would tie the right lights to the left lights by a direct cable.

I did find it strange that the headlights worked normally, and even the brake lights on both sides worked - ruling out the possibility of dead wires or a bad connection on the right side. I assumed all running lights (not including headlights) were on the same circuit, however taking a look at the fuses showed that they are in fact not on the same circuit. Here are some circuits I've been able to deduce:

- Headlamps
- Brake lights
- Indicators
- Left running lights
- Right running lights

If one of these things don't work, the circuit is dead. I'm still trying to figure out what's wrong with the indicator.

Cleaning out the fuses (shop was too far away for me to go pick new ones up, and these were fine after a clean-up anyway - degreaser and some sand paper) and testing with a multimeter, amazingly the lights turned on! Who knows what else started working...

I've bought a timing light which I plan to use next weekend to adjust timing. My brakes should be arriving soon, so I'll try to get that done too. We'll see how things pan out.

Also I should mention that the tachometer completely randomly started working, but the clock stopped working. I don't know what I prefer. Tach, I guess.

Monday, February 9, 2009

Britain and America

While British cars have traditionally been compact, fun to drive, and perhaps more style than power, American cars tend to be the complete opposite. The evidence:


I bet I could drive my B in through the DTS's passenger door.

(2008 Cadillac DTS that my girlfriend rented)