Monday, May 18, 2009

New exhaust, new woes

  • Installed new complete Peco exhaust system
  • No more exhaust fumes inside the cabin
  • Engine can breath freely
I plan on eventually turning this car into a real performance car, so the first step is always to put in a decent exhaust. The previous exhaust had bulged open at the end of the exhaust header and was letting exhaust fumes into the cabin, which led me to believe that it may be clogged somewhere (which is not surprising if you consider how much time this car has spent under a tarp over the past few years). So I decided to pull it and replace the whole thing.The exhaust header, though rusted, was still in great shape. I thought of just sanding it down and repainting it, but had a hard time finding head pipes to connect it to a new exhaust. The rest of the exhaust was in good shape (barely any rust), but seemed clogged. In the end I bought a new Peco header (see image above) with the rest of the exhaust system, a 2-inch straight through system (and a big FU to the EPA). Note that in Maryland classic cars are exempt from state emissions testing, and so removal of the catalytic converter (if there is one, mine did not have one) is legal. This is not the case in California, where pretty much any exhaust or emissions modification is illegal. So check your state regulations to make sure it is as cool as Maryland :-) (if you're in a southern state or Michigan, you're good to go).

Update: It has been brought to my attention that removing the catalytic converter is illegal by federal law. Though Maryland is not going to check (assuming you have historic tags), you would apparently still be breaking the law if you remove the converter. A car must always retain its originally installed emissions regulation equipment, even if it fails (!). So draw your own conclusions...

There are several considerations when purchasing an exhaust system, but it generally boils down to whether you want a comfortable or a sporty ride. My Peco system is incredibly loud, and after a short drive my ears were ringing (this will probably improve when I put in sound insulation). It only has the one straight-through muffler, so not really ideal for comfortable riding. If you're looking for a comfortable ride you'll need a decent muffler or a 2-muffler setup (more common on the MGB). If you're a tree-hugger you'll also want to throw in a cat convertor.

When picking a header one should pick one with the least amount of curves, thus improving the flow of gasses. More angles mean a slower flow, though this is generally a very modest decrease. On the MGB there are only 3 exhaust ports for a 4 cylinder car, which seems wrong. This was a conscious choice by the engineers to save manufacturing costs, but was designed in such a way that with it shouldn't impede exhaust fumes too much, however, efficient expulsion of those fumes is very important. The centre two exhaust valves are connected (the so-called 'siamese' system) and go out through one pipe, so naturally that pipe should be larger than the other two (which each serve one valve respectively). The Peco header has a larger centre port which merges with the other two towards the end of the pipe, thus enabling a better flow of exhaust fumes. There are MGB engine upgrades available that allow for four intakes on one side and four exhausts on the other side of the engine (but be prepared for some machining).
A major issue when picking exhaust systems for the MGB is picking the right setup. Over the years the exhaust and intake system changed many times, so a 1980 MGB will have a completely different setup to a 1965 MGB (and I mean radically different). Later models have catalytic converters (under the hood, not in the back) and different intakes. I would strongly recommend retrofitting your car to the old-fashioned exhaust system as I did, but you will also most likely need to change your carburettor and intake manifold for this. This allows for a better freer flow, and will bring your engine closer to the original 98 hp it once had. Consider the Weber DGV (downdraft) if you do this conversion.

The exhaust arrived and I set out to install it, which is a very simple procedure in principle. As it differs on most cars I'm not going to give detailed instructions. Rather, just take a look at your old exhaust and figure out a way of putting the new one in. Don't know what to do? Just start taking it out, and make sure the new exhaust system fits snugly and doesn't move. If it is designed for the MGB it will fit, you just have to keep trying. Here are some tools you will need:
  • An electric saw (to saw through pipes and bolts that won't give way)
  • A wrench set
  • Ramps !!! (I used jack stands and a floor jack, which I do not recommend)
  • WD-40
  • Muffler clamps (to hold together the pieces of the exhaust system; typically not included)
  • A friend to hold stuff
  • Patience. Lots and lots of patience. This took me 2 days and was incredibly frustrating.
Note that on some exhaust systems, as was the case on mine, the intake header has to be in place before you put in the exhaust header. Use a mallet (or a hammer if you get fed up like I did) to get everything in place. The Peco seemed to touch the rear suspension, but that was because I had the pipes in the wrong order, so be mindful of that.
Now, I was planning on posting a video showing the before and after sounds. Unfortunately my carburettor is acting up, and the damn car won't rev lower than 3000rpm. As I had the intake out anyway I thought I'd rebuild the carburettor. Apparently I did something wrong. As soon as I figure out what I did wrong I'll post it and my solution. In the meanwhile, if anyone has any suggestions....

Thursday, May 7, 2009

Keys

  • New keys!!
If you live in the mid-Atlantic region like I do, you'll have noticed that the only spot of sun we've had in the past week and a half was for a few hours yesterday morning. Naturally, for the gradstudent who doesn't have a garage, this is disastrous. As such I have now piled up parts I plan to install over the next few weeks, such as a brand new 2-inch straight-through exhaust (with accompanying manifold) and a carb rebuild kit. More on this as soon as the weather picks up.

One new part that arrived that I was able to test out was a set of keys I ordered. You see, when I got the car I didn't have any keys at all, so the car was left unlocked pretty much all the time, and I used a screw-driver to start the car (the key had broken off in theignition). In an earlier post I described how I had to drill out the lock on the gas cap. I really needed new keys but didn't know what to do.

Taking the trunk lock off and bringing it to a (Sears and Strosniders) lock smith, they told me they couldn't make keys for it. Of course, they were just being lazy as it's pretty easy to do. I gave up and started looking up new locks to install, but much to my dismay it seemed like I'd be putting down close to $100 for a new set of locks! Which is outrageous when you consider that I already have good locks, I just need keys. I left it at that and hoped nobody would do anything to my car.

Much later I finally realised that there's such a thing as a lock code, a number that defines what key combination you need. Further, depending on the model of your car you can look up what type of key you need, attach your lock number to it, and the locksmith can make you a brand new key. For the 1977 MGBs you're looking at an FS type key, with three numbers following it describing the combination. Ignition keys are of type AA. More info here.

Great, I found the key combination (it was printed on the door locks and on the trunk lock, see this), and now all I had to do was order the keys, which I did from here. I chose Keys4Classics.com because they have a more personal service, so despite being on the other side of the world your order will be correct. You can even send them a photo of your key (or part of your key) and they'll reproduce it. Keep in mind, though, that they are located in Australia (but shipping doesn't take much longer, about a week total for me).

When you finally have your new keys and are ready to test them out, keep the following in mind:
  • Make sure the lock is sound, not completely rusted, and not loose. I didn't check my trunk lock, which was loose from the last time I had opened it, and ended up almost permanently locking the trunk. I was able to jimmy it open without drilling the lock, but I was freaking out.
  • Use a lubricant on the locks and the general locking mechanism. If your locks haven't been used in ages, like mine, they will need some lubrication or you stand a chance of breaking the whole thing.

Sunday, April 26, 2009

Good Timing

  • Adjusted the timing
  • Partially fixed misfiring problem
  • Gained more engine power (timing was way off)
  • Figured out how to set timing
Adjusting the timing is another one of those simple miracle cures that can really improve things. Just to name a few, the engine won't sound like a tractor anymore, emissions will improve, fuel economy will improve, no more misfiring, etc. It's also one of the easiest things you can do ... that is if you know what to do.

For a long time I didn't know what to do, and so kept postponing this. I finally took the plunge this weekend and figured out how to check and adjust timing. Sure enough, the timing was off (as if the misfiring hadn't told me that already).

First off, you'll need some equipment. You'll need a timing gun (see image below), a 12 V automotive source for the timing gun (car battery; from another car if you have an MGB), a 12 mm wrench, and some white-out (with a brush works best).


The 1977 MG B specs state that at idle (850 rpm) the timing mark should be at 5 degrees BTDC (before top dead centre), and for 1500 rpm at 10 degrees BTDC. This could be different on your car, so check before doing anything by reading a service manual. On my car I found the instructions on a lable under the hood (where other emissions info such as spark plug gaps etc is found).

Update: If you use a weber (like I do) you'll need to set idle to 14 BTDC. However this differs from car to car. Mine uses a free-flow Peco exhuast, so 14 is correct for me, but if you still have a catalytic converter you will probably need a lower offset.


Finding TDC is not the most obvious thing on my car. One can generally locate it as the 'odd one out' of the teeth that make up the timing alignment. Usually it's slightly bigger, however note that this differs on MGBs (based on the year they were built). The image above shows the situation on my car, the 'teeth' illustrated by #1 and the notch in the front wheel by #2. I used white-out to make them more clear. TDC is - I guessed correctly - the right most tooth. As per the specs of the car, at idle I need to be at 5 degrees BTDC (the 2nd tooth from the right), and at 1500 rpm at 10 degrees (centre tooth). All teeth have a 5 degree separation. On some MGBs these teeth are at the bottom of the engine.

What you do is simply adjust the distributor by turning it left and right till the notch on the wheel lines up with the 5 degree mark on the teeth (at idle). Do this by hooking up the timing gun to spark plug 1, the plug closest to the front of the car (the power cable on mine wasn't long enough to go the the battery, so I had to bring my other car next to it to connect it to a source), and aiming it at the teeth. To turn the distributor loosen the nut holding the sleeve of the distributor to the engine block (#3 in the image below).


And the result is... (idle, 1500 rpm, then idle again)


Note that all this should be done after driving the car around for atleast 5 minutes and everything is at running temperature. The timing marks on my car are on top of the bottom wheel (drive pulley?), but on older models it is often underneath.

Thanks to MG's great battery placement, my timing setup looks like this:
Get a friend to hold the gun.

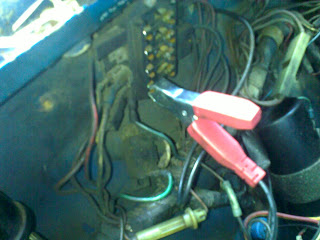
UPDATE: I'd like to say that the top picture was a joke, but actually I was just being an idiot. A much easier timing gun setup is: connect the ground lead to a bare part of the frame (for example, that thing that sticks out of the engine where the air pump used to be), and the hot lead to the bottom fuse (ONLY TOUCH THE BOTTOM FUSE). The images below (taken with my phone... sorry) should explain.


Tuesday, April 21, 2009

Great weather

  • Resolved frustration at car and life in general.
The weather this weekend was perfect, so rather than spend hours working on the MG I decided to instead sit back and enjoy what I've done so far. So, no post this time, other than letting you know I enjoyed the weather. Also I recommend other enthusiasts to do the same.


Sunday, April 5, 2009

Rear (drum) brakes

  • Replace wheel (brake) cylinders
  • Resolved horrible braking power
  • Stopped losing brake fluid
I think that at this point I don't need to make any more jokes as to how this project is turning out to be one giant Pandora's box. Fix one thing, get ten more problems. Clock starts working, tach dies. Etc. So I'll just cut to the chase: fixed rear brakes, passenger side headlight doesn't work on regular mode (replacing bulb didn't fix it).

Despite changing the front brakes, I still wasn't stopping in a reasonable distance. After removing one of the rear wheels, the grease and liquids all over the place quickly revealed that the wheel cylinder was broken and severely leaking fluids. This is contrary to my original thought, that it had locked up. The other wheel cylinder was fine, though very rusty, so we replaced it anyway.

There are two ways to do this. The first way details the long, tedious (but correct), way. The second is the short-cut I recommend to anyone who knows what they're doing (Takes about 20 minutes instead of an hour and half). Also keep in mind to use something to hold the brake pedal up. I attached it to my steering wheel using a bungie cord.

1. Remove wheels, jack up car (rest floor jack on differential, I rested the jack stands on the reaf suspension leafs).
2. Use a 7mm hex bit to remove the two screws holding the brake cover. I had to tap the cover gently with a hammer to get it off.
3. Remove the two retaining springs (see image below - click to enlarge).
4. Remove the top spring (see image above). The shoes will start coming lose here.
IMPORTANT: Remember which shoe goes where!!! Make a note of all holes and pins in their appropriate place, so when you put everything together later you know what you're doing! You can severely damage your brakes if you do this wrong!!!
5. (You don't really have to do this, we didn't) Remove the bottom springs and take off the shoes.
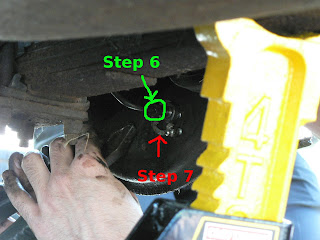
6. Unscrew the nut holding the brake line to the wheel cylinder. Keep in mind that you'll be losing brake fluid here, so put a pan underneat the wheel.

7. Remove the retaining clip on the back side (where the nut was).
8. Remove the wheel cylinder. Note that there are three holes where the cylinder was attached: one for brake fluid, a bleed valve, and a pin to hold it in place.
9. Take the new wheel cylinder and pour brake fluid in it. Squeeze the outsides together in bursts to let out any air still in the cylinder. You do not want air anywhere in your brake system.
10. Install the new wheel cylinder, keeping the three holes and what goes where in mind. We had to use a hammer to nudge it in properly (the holder pin was a tad larger). Attach the new clip (we weren't able to, so we just reused the old one) and reconnect the brake-line nut.
11. Reverse the installation, bleed the line, and you're done! Keep in mind that the reverse installation takes a while, and depending on how many springs you removed, can be rather tedious.

I also cleaned the brakes before I reassembled everything. One should generally use brake cleaning fluid for this, lacking that I used carb cleaner.

Rather than do all this you can also try to jimmy out the shoes without removing any springs (pull them apart so they go over the wheel cylinder), and wedge the wheel cylinder out. We did this for the second brake, which worked out fine and took less time. (This is the second method)

John Twist at University Motors has a video on how the brakes look and work.

Many thanks to my girlfriend's father, thanks to whom the whole installation could be done in less than 3 hours. And of course my girlfriend for taking the pictures.

Wednesday, April 1, 2009

NEW PAINT JOB!!!!

Well, folks, I finally did it. I finally got a new paint job!!!!!! I even had them put in custom racing stripes and aracing number. Later I took it into a field for some shots. Take a look (click to enlarge):


Snazzy.


Happy April Fools day.

Monday, March 30, 2009

University Motors

Many people have called me insane for attempting to restore this car, however they often fail to realise that the MG following is quite large: parts are easily available and quite cheap, numerous books and manuals have been written, and there is an extremely large fan base ready and willing to help (generally for free).

One of my references before I do any work is University Motors, that has an online database of videos on how to do things on MGs (B's mostly, but also some rarer models). I've checked out their videos on Youtube on several occasions and used them to find parts on the B. The videos are good for getting a rough idea on what to do - Mr Twist tends to go over things a bit quickly and the video quality isn't always that great - but can be invaluable if you don't know how to find top dead centre, start your car from under the hood, or even put the top down the right way. Occasiaonally they also show videos of strange problems, such as one where one of the shocks froze.

Check it out for some immediate help (that you can even access from your phone while working on the car, if necessary).